You have a logo saved as a PNG file. You need it embroidered on shirts, printed on signage, or applied to merchandise. But the vendor keeps asking for a vector file — and you are not sure what that means or how to convert a PNG to a vector for Embroidery and Printing.
This guide explains exactly how to convert a PNG to Vector for Embroidery and Printing, why it matters for embroidery and printing, how the process works step by step, and when it makes sense to do it yourself versus hiring a professional.
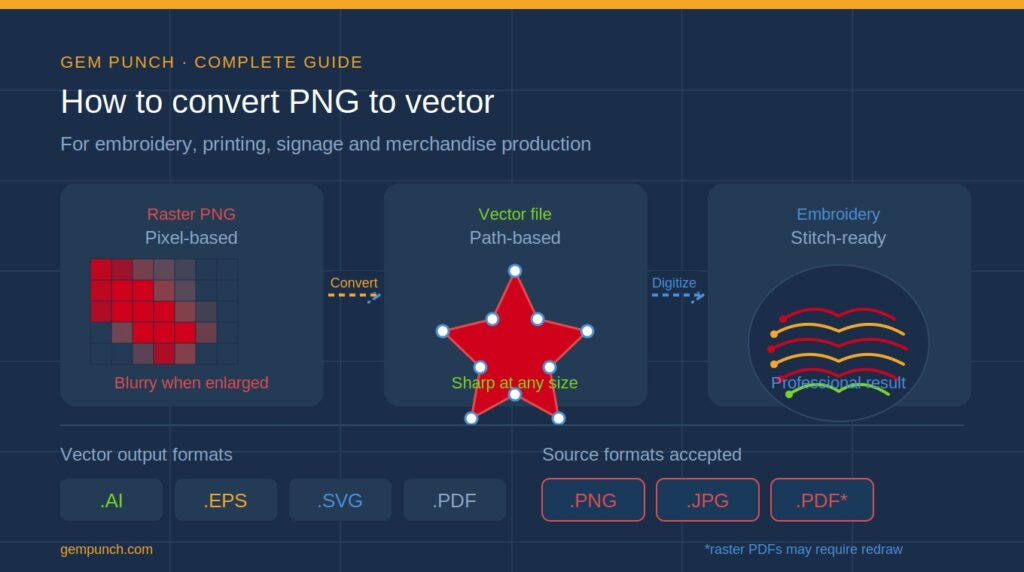
Quick answer: A PNG is a pixel-based image that loses quality when scaled. A vector file is built from mathematical paths that stay sharp at any size. Converting PNG to vector is essential before embroidery digitizing or large-format printing.
What Is the Difference Between PNG and Vector?
PNG — Pixel-based (raster)
A PNG is made up of a grid of pixels. Zoom in far enough and you see individual colored squares. Enlarge the image beyond its original size and it becomes blurry and pixelated. PNG files are ideal for screen display — photos, web graphics, social media images — but they are not suitable for embroidery or large-format print production.
Vector — Path-based (scalable)
A vector file is built from mathematical equations that define paths, curves, and shapes. Because the image is defined mathematically rather than as a fixed grid of pixels, it can be scaled to any size — from a thumbnail to a billboard — without any loss of quality. Common vector formats include AI (Adobe Illustrator), EPS, SVG, and PDF with vector data.
| PNG (Raster) | |
| Built from | Pixels |
| Scalability | Fixed — blurs when enlarged |
| File size | Larger for complex images |
| Best for | Photos, web graphics, social media |
| Used in embroidery? | Not directly — needs conversion first |
| Vector | |
| Built from | Mathematical paths and curves |
| Scalability | Infinite — sharp at any size |
| File size | Smaller for logos and graphics |
| Best for | Logos, embroidery, print, signage |
| Used in embroidery? | Yes — ideal source for digitizing |
Why Do You Need a Vector File for Embroidery?
Embroidery digitizing — the process of converting artwork into a stitch file for an embroidery machine — produces far better results when the source file is a clean vector. Here is why:
- Vector files have clearly defined edges and color boundaries, making it easy to map stitch paths accurately
- There is no pixelation or compression artifacts for the digitizer to work around
- Color areas are clean and separated, making thread color selection straightforward
- The file can be scaled to any placement size without degrading the quality the digitizer works from
When a digitizer receives a low-resolution PNG, they have to interpret blurry edges and guess at fine details — which leads to more revisions, higher cost, and lower quality output. A clean vector file eliminates all of that.
Important: Converting to vector does not replace digitizing. Vector conversion prepares your artwork for digitizing — it is a separate upstream step. You still need the embroidery digitizing service to create the actual stitch file.
How to Convert PNG to Vector: Step by Step
Step 1 — Assess your source PNG
Before converting, evaluate what you are working with. The best candidates for PNG-to-vector conversion are:
- Logos with clean, defined shapes and solid colors
- Icons, badges, and graphic marks
- Text-based designs with clear letterforms
- Simple illustrations with limited color counts
Photographic images and designs with complex gradients, shadows, or realistic shading are much harder to vectorize cleanly. They can be done, but the result will be a simplified, stylized interpretation rather than a faithful reproduction.
Step 2 — Choose your conversion method
There are three main approaches to PNG-to-vector conversion, each with different trade-offs:
Option A — Automatic tracing software
Tools like Adobe Illustrator’s Image Trace, CorelDRAW’s PowerTRACE, and the free online tool Vector Magic can automatically trace a PNG and generate a vector file. This works well for simple, high-contrast designs with clean edges and solid colors.
The limitation is that automatic tracing rarely produces clean, production-ready results for complex logos. Paths are often jagged, colors merge incorrectly, and anchor points multiply unnecessarily. The output usually requires significant manual cleanup before it is usable.
Option B — Manual redraw in vector software
A designer uses vector software (Adobe Illustrator, CorelDRAW, or the free Inkscape) to manually trace over the PNG, rebuilding every shape and path by hand. This produces the cleanest possible result — smooth curves, correct colors, minimal anchor points — but requires design skill and takes significantly more time than auto-tracing.
This is the method professional vector conversion services use for complex or detailed logos.
Option C — Hire a professional vector conversion service
For business logos and designs that will be used commercially, the fastest and most reliable option is hiring a professional. A good vector conversion service will manually redraw your artwork, deliver a clean AI or EPS file, and typically turn it around within 24 hours for $15–$50 depending on complexity.
Step 3 — Clean up the vector file
Whether you use auto-tracing or manual redraw, the file should be reviewed and cleaned up before use:
- Remove unnecessary anchor points — too many points create jagged curves
- Simplify overlapping shapes — merge fills that should be continuous
- Separate colors onto individual layers for easy editing
- Check that all paths are closed — open paths cause issues in both printing and digitizing
- Convert text to outlines — this ensures the font is embedded and does not depend on the recipient having the same font installed
Step 4 — Save in the correct format
The right output format depends on what the vector file will be used for:
| Use Case | Recommended Format |
| Embroidery digitizing | AI or EPS (preferred), SVG accepted |
| Large-format print / signage | AI, EPS, or PDF (vector) |
| Screen printing | AI or EPS with separated colors |
| Web use | SVG |
| General sharing / editing | PDF with vector data |
Can You Do It Yourself for Free?
Yes — several free tools can convert simple PNGs to vector:
- Inkscape (free desktop software) — use Path → Trace Bitmap for auto-tracing
- Vector Magic (online) — free trial available, produces cleaner auto-traces than most tools
- Adobe Express (free tier) — basic auto-trace for simple designs
- Vectorizer.io — free online auto-tracer for simple logos
For simple, clean logos with 2–4 solid colors, these tools can produce usable results. For anything more complex — detailed emblems, fine typography, multi-color badges — the output will typically need significant manual cleanup or professional intervention.
Rule of thumb: If your logo has more than 4 colors, fine detail, or thin lines under 1mm, auto-tracing tools will struggle. A professional conversion will save you time and produce a far cleaner result.
What Does Professional Vector Conversion Cost?
Professional vector conversion is priced based on design complexity:
| Complexity Level | Typical Price Range |
| Simple logo (1–3 colors, clean shapes) | $15 – $30 |
| Medium complexity (4–6 colors, some detail) | $30 – $60 |
| Complex design (many colors, fine detail) | $60 – $120 |
| Full redraw of damaged/low-res artwork | $80 – $150+ |
Like embroidery digitizing, vector conversion is a one-time cost. Once you have a clean vector file, you own it and can use it for every future project — embroidery, print, merchandise, signage — without paying again.
Common Mistakes to Avoid
- Using a low-resolution PNG as the source — a 72 DPI web graphic produces poor conversion results. Use the highest resolution version available
- Accepting auto-trace output without reviewing it — always open the file and check for jagged paths, color errors, and missing detail
- Forgetting to convert text to outlines — missing fonts cause design files to display incorrectly when opened on another machine
- Using a vector PDF as a source without checking it — some PDFs contain rasterized images, not actual vector data. Open in Illustrator and check
- Skipping vector conversion and sending a PNG directly to the embroidery digitizer — always convert first for the best stitch output
PNG to Vector for Printing vs Embroidery — Is There a Difference?
The vector conversion process is the same regardless of the end use. However, the requirements downstream differ:
- For embroidery: the vector file is handed to a digitizer who converts it into a stitch file. Color counts matter — embroidery uses thread colors, so designs with 15+ colors may need simplification
- For screen printing: colors need to be separated onto individual layers, one per ink color. Spot colors (Pantone references) are preferred over CMYK
- For large-format print: color mode should be CMYK for print output. RGB vector files need to be converted before sending to a print provider
- For digital/web use: SVG format is ideal — it is resolution-independent and loads fast in browsers
Frequently Asked Questions
Can I convert a JPG to vector as well?
Yes — the process is identical. JPG and PNG are both raster formats and both require the same vector conversion workflow. JPGs are often lower quality due to compression artifacts, so provide the highest quality JPG available.
Will the vector file look exactly like my PNG?
For simple logos with clean shapes and solid colors, yes — a professional conversion will be virtually identical. For complex designs with gradients, shadows, or photographic elements, the vector version will be a stylized interpretation. Your conversion service should show you a preview before you approve the final file.
How long does vector conversion take?
Professional services typically deliver within 12–24 hours for standard complexity designs. Rush turnaround (4–8 hours) is usually available for an additional fee.
Do I need to convert to vector if I already have a high-resolution PNG?
For embroidery — yes, always. Even a 300 DPI PNG needs to be converted to vector before digitizing for best results. For large-format print over roughly A3 size, vector is also strongly recommended to avoid any quality loss at scale.
Final Thoughts
Converting a PNG to vector is a foundational step for anyone who needs their logo or artwork used in embroidery, large-format print, screen printing, or merchandise production. It is a one-time investment that makes every subsequent production job faster, cheaper, and higher quality.
For simple logos, free auto-tracing tools can get you there. For business-critical artwork, a professional conversion delivers clean, production-ready files that work flawlessly across every application.
Need your PNG or JPG converted to a clean vector file? Gem Punch offers professional vector conversion with 24-hour turnaround, delivered in AI, EPS, or SVG format. Get a free quote at gempunch.com.