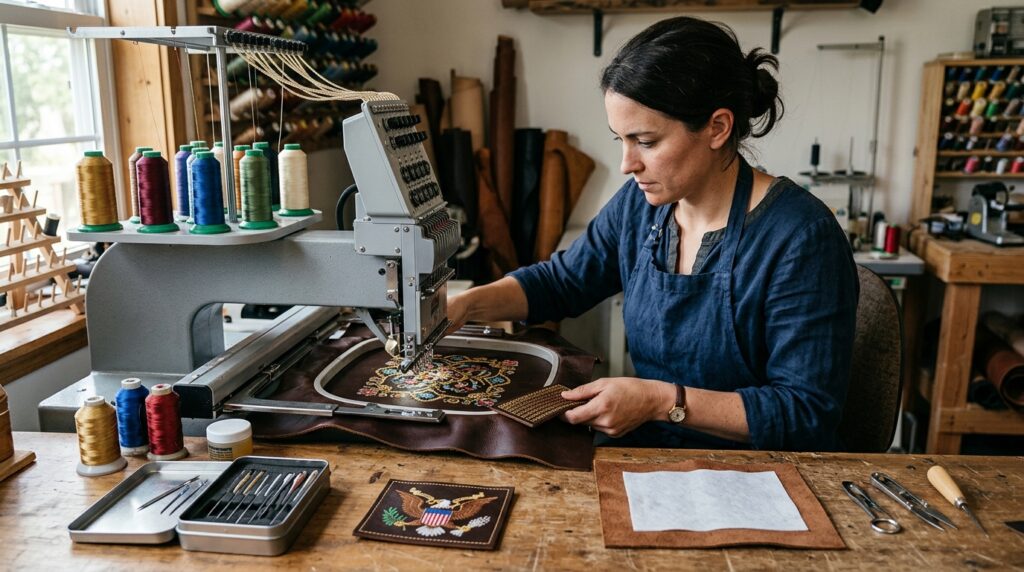
Leather is one of the most luxurious and durable materials for custom embroidery—but it is also one of the most unforgiving. One wrong stitch, and you have a permanent hole in an expensive hide. Whether you are branding leather jackets, luxury bags, motorcycle vests, or corporate portfolios, understanding how embroidery on leather interacts with is the difference between a premium product and a costly mistake.
At Gem Punch, we digitize and produce leather embroidery daily for brands, motorcycle clubs, fashion labels, and corporate clients. This guide covers everything you need to know: the techniques that work, the challenges you will face, and the pro tips that separate amateur results from professional-grade leather embroidery.
Why Embroider on Leather?
Leather carries instant prestige. It signals durability, craftsmanship, and timeless style. Adding embroidery to leather elevates it further—transforming a plain jacket or bag into a personalized statement piece or branded asset.
Common Leather Embroidery Applications
| Application | Leather Type | Typical Design |
|---|---|---|
| Motorcycle vests | Cowhide, buffalo | Club patches, name tapes, memorial panels |
| Luxury handbags | Full-grain, Italian | Brand logos, monograms, limited-edition art |
| Bomber jackets | Lambskin, cowhide | Back patches, sleeve details, unit insignias |
| Corporate portfolios | Bonded, genuine | Company logos, initials, event branding |
| Wallets & belts | Top-grain, exotic | Small logos, decorative borders |
| Footwear | Suede, nubuck | Brand marks, custom designs |
| Furniture & auto interiors | Automotive-grade | Monograms, logos, decorative panels |
The commercial value is clear: leather embroidery commands higher prices than fabric embroidery, attracts premium clientele, and creates products that last decades.
The Core Challenge: Leather Does Not Forgive
Unlike cotton, polyester, or twill, leather has zero recovery. Once a needle pierces the surface, that hole is permanent. There is no fiber memory to close the gap. This fundamental property creates every challenge in leather embroidery.
Key Material Properties
| Property | Fabric (Cotton/Twill) | Leather |
|---|---|---|
| Fiber recovery | High—holes close partially | None—holes are permanent |
| Tensile strength | Moderate | Very high |
| Flexibility | High | Low to moderate |
| Thickness variation | Minimal | Significant |
| Heat sensitivity | Moderate | High—scorches easily |
| Needle penetration | Easy | Requires force |
| Stitch density tolerance | High | Low—causes tearing |
Because leather does not stretch or recover, every stitch must be placed with precision. Over-stitching, poor digitizing, or incorrect machine settings will crack, tear, or distort the leather permanently.
Leather Types: What Works and What Does Not
Not all leather is suitable for embroidery. Here is the breakdown.
Best for Embroidery
Cowhide and Buffalo
The industry standard for motorcycle vests, jackets, and heavy bags. Thick, stable, and consistent enough to hold stitches without tearing. Full-grain and top-grain varieties perform best.
Lambskin
Soft and lightweight, ideal for fashion jackets and luxury goods. Requires lighter touch—smaller needles, reduced density, careful hooping.
Genuine Leather (Corrected Grain)
Processed to remove imperfections, creating a uniform surface. Good for corporate portfolios, belts, and promotional items where consistency matters more than character.
Bonded Leather
Leather fibers bonded with latex or polyurethane. Affordable and stable, though less durable long-term. Fine for low-wear applications like book covers or presentation folders.
Challenging but Possible
Suede and Nubuck
The brushed, fuzzy surface hides stitches well but is prone to distortion under tension. Requires specialized stabilizers and very careful hooping.
Exotic Leathers (Alligator, Ostrich, Python)
Beautiful but unpredictable. Scale patterns, natural armor, and uneven thickness make digitizing complex. Only attempt with experienced digitizers and test samples.
Avoid for Embroidery
Patent Leather
The glossy, plastic-coated surface cracks under needle penetration. Embroidery destroys the finish.
Thin or Faux Leather (Low-Grade PU)
Tears under stitch tension. The backing separates from the surface layer, creating bubbles and rips.
Very Soft, Unbacked Leather
Lacks structural integrity. Hooping distorts the shape, and stitches pull through.
Essential Techniques for Leather Embroidery
1. Needle Selection
Use sharp-point leather needles (also called wedge-point or cutting-point needles). These blades slice through the leather cleanly rather than pushing fibers apart. Standard ball-point needles, designed for knit fabrics, will struggle and cause ragged holes.
| Leather Thickness | Needle Size | Type |
|---|---|---|
| Lightweight (under 1 oz) | 70/10 or 75/11 | Sharp point |
| Medium (1–2.5 oz) | 80/12 | Sharp point |
| Heavy (2.5–4 oz) | 90/14 | Sharp point |
| Extra heavy (4+ oz) | 100/16 | Sharp point or diamond point |
Pro tip: Replace needles more frequently than with fabric. Leather dulls needles faster, and a dull needle causes ragged perforations and thread breaks.
2. Stabilizer Strategy
Stabilization is critical because leather has no natural give. The wrong stabilizer causes puckering, distortion, or hoop burn.
Recommended stabilizers:
- Tear-away stabilizer (medium to heavy weight): The standard choice. Provides rigidity during stitching and tears away cleanly afterward without pulling stitches.
- Cut-away stabilizer: For large or dense designs where tear-away might not provide enough support. Trim close to the stitch line with scissors.
- Adhesive stabilizer (spray or peel-and-stick): Essential for small or irregular leather pieces that cannot be hooped conventionally. Prevents shifting without clamping pressure.
- Water-soluble topping: Place on top of suede or nubuck to prevent stitches from sinking into the nap. Rinses away after embroidery.
Never use: Heat-away stabilizers on leather. The heat required to dissolve them will scorch or shrink the hide.
3. Hooping Without Damage
Hooping leather is the most delicate step. Excessive pressure creates permanent creases, hoop burn, or depressions.
Best practices:
- Use magnetic hoops or clamp hoops instead of traditional screw-tightened hoops. They apply even pressure without crushing.
- Hoop the stabilizer only, then adhere the leather to the stabilizer with temporary spray adhesive or double-sided tape. This eliminates hoop pressure on the leather itself.
- If direct hooping is necessary, use the largest hoop possible to reduce tension on the leather area. Pad the inner hoop with soft tape to prevent sharp edges from cutting in.
- Never stretch leather while hooping. Lay it flat and natural. Stretching creates tension that releases after unhooping, distorting the design.
4. Digitizing for Leather
This is where professional results are made or lost. Standard embroidery digitizing assumes fabric recovery. Leather digitizing assumes zero recovery.
Critical digitizing adjustments:
| Parameter | Standard Fabric | Leather |
|---|---|---|
| Stitch density | 0.4–0.5 mm | 0.5–0.6 mm (reduced by 15–20%) |
| Pull compensation | Moderate | Minimal—leather does not stretch |
| Underlay | Standard | Light or none—reduces perforation count |
| Stitch length | Standard | Slightly longer to reduce puncture density |
| Small text | 4–5 mm height | Minimum 6–7 mm—smaller sinks or tears |
| Satin stitch width | 1–12 mm | Avoid very wide satins—they cut like a blade |
| Fill patterns | Any | Use run stitch or light fill; avoid heavy zigzag |
Pro tip: Reduce overall stitch count by 20–30% compared to fabric versions of the same design. Fewer stitches mean fewer holes, less stress, and cleaner results.
5. Thread and Tension
Thread choice:
- Rayon: Standard for sheen and color vibrancy. Works on most leather types.
- Polyester: More durable and colorfast. Better for outdoor gear, motorcycle leathers, and items exposed to sun and sweat.
- Metallic: Stunning on black or brown leather but requires larger needles and slower speeds to prevent shredding.
Tension settings:
- Top tension: Slightly looser than for fabric. Tight tension pulls stitches into the leather surface, creating dimples.
- Bobbin tension: Standard or slightly tighter to balance the looser top tension.
- Test on a leather scrap from the same hide before production. Every batch of leather behaves differently.
6. Machine Speed
Slow down. Leather embroidery should run at 60–70% of normal machine speed. High speeds generate heat through friction, which can scorch light-colored leather or melt synthetic finishes. Slower speeds also give the needle time to penetrate cleanly without deflecting.
Common Leather Embroidery Problems and Solutions
Problem 1: Tearing or Cracking Along Stitch Lines
Cause: Stitch density too high, underlay too aggressive, or leather too thin.
Solution: Reduce density by 20%, eliminate underlay for small designs, or upgrade to a heavier leather grade. For thin leather, consider a leather patch sewn on rather than direct embroidery.
Problem 2: Puckering or Distortion Around the Design
Cause: Improper hooping, insufficient stabilizer, or digitizing without pull compensation adjustment.
Solution: Use adhesive hooping on heavy tear-away stabilizer. Ensure the digitizer reduced pull compensation specifically for leather.
Problem 3: Thread Breaks Every Few Stitches
Cause: Dull needle, incorrect needle size, or tension too tight.
Solution: Replace needle, verify size matches leather thickness, loosen top tension incrementally until breaks stop.
Problem 4: Hoop Burn or Permanent Creases
Cause: Hoop pressure too high, hooping time too long, or sharp hoop edges.
Solution: Switch to magnetic or clamp hoops. Use adhesive hooping methods. If creases occur, gently warm the leather with a hair dryer and massage flat—results vary by leather type.
Problem 5: Stitches Sinking Into Suede or Nubuck
Cause: Nap of the leather swallows stitches, making them invisible.
Solution: Use water-soluble topping over the design area. The topping holds stitches above the surface and rinses away clean.
Problem 6: Color Bleeding or Finish Damage
Cause: Excessive machine heat, incompatible thread dye, or moisture from soluble topping.
Solution: Reduce machine speed, use polyester threads (more colorfast), and ensure leather is completely dry before and after any water-soluble topping application.
Advanced Techniques for Premium Results
3D Puff Embroidery on Leather
Puff embroidery adds dramatic raised dimension. On leather, it requires:
- Specialized puff foam designed for leather applications (standard foam may react with leather finishes)
- Reduced density on the puff areas to prevent foam collapse
- Larger needle (90/14 or 100/16) to penetrate foam and leather cleanly
- Slower speed to prevent foam tearing
Puff on leather is stunning for motorcycle club rockers, luxury brand logos, and statement jacket backs. It is unforgiving—master flat leather embroidery before attempting puff.
Applique on Leather
Instead of stitching directly onto expensive leather, sew a fabric or thinner leather patch onto the main leather surface. This technique:
- Eliminates direct perforation of the primary hide
- Allows for more complex designs on a separate, replaceable panel
- Creates visual contrast between leather types (e.g., suede applique on smooth cowhide)
Laser Etching + Embroidery Hybrid
Some high-end producers combine laser etching (which burns a shallow design into the surface) with embroidered outlines or accents. The laser handles detail and shading; embroidery adds texture and color. This is advanced production requiring specialized equipment.
Debossed Embroidery
A technique where the design is first debossed (pressed into the leather without cutting) and then embroidered within the depressed area. The embroidery sits flush or slightly recessed, creating a subtle, sophisticated look popular in luxury automotive and leather goods.
Leather Patch vs. Direct Leather Embroidery
If direct embroidery feels too risky, consider leather patches—embroidered designs on a separate leather piece that is then sewn, riveted, or glued onto the main item.
| Method | Pros | Cons |
|---|---|---|
| Direct embroidery | Seamless, integrated, no edges | Permanent, risky on thin/expensive leather |
| Leather patch | Replaceable, less risk, more design freedom | Visible edge, additional production step |
| Woven leather patch | Fine detail possible | Less texture than embroidery |
| Printed leather patch | Full color, photo-realistic | Less durable, no tactile quality |
For one-off luxury items or experimental designs, patches are the safer choice. For production runs of branded goods, direct embroidery signals higher craftsmanship.
Industry-Specific Best Practices
Motorcycle Clubs and MC Patches
Motorcycle vests use heavy cowhide or buffalo leather. Embroidery is typically direct on the back panel for club patches, or on leather patches that are then sewn on for rockers and officer titles.
- Use 100% polyester thread for UV and sweat resistance
- Sew-on backing only—iron-on adhesive fails under road vibration and heat
- Minimum 6 mm text height for readability at riding distances
- Consider merrowed border on leather patches for clean, fray-proof edges
Fashion and Luxury Goods
High-fashion leather embroidery demands perfection. Every stitch is visible.
- Use finest needles (70/10) on lambskin and delicate hides
- Match thread sheen to leather finish—matte thread on matte leather, glossy on patent (though avoid patent for direct embroidery)
- Test on identical leather scraps from the same tannery batch
- Consider hand-guided embroidery for true luxury one-offs
Corporate and Promotional
Leather portfolios, padfolios, and gift items prioritize consistency and speed.
- Bonded leather is acceptable for mid-tier corporate gifts
- Small left-chest or corner placement works best
- Metallic threads elevate perceived value for executive gifts
- Always order pre-production samples for corporate color matching
Cost Expectations for Leather Embroidery
Leather embroidery costs more than fabric embroidery due to material risk, slower production, and specialized handling.
| Factor | Cost Impact |
|---|---|
| Leather type (full-grain vs bonded) | Premium hides increase material cost 50–200% |
| Design complexity | Intricate designs require slower speeds and more needle changes |
| Stitch count | Higher count = more time, more risk, higher cost |
| Sample approval | Pre-production samples add 20–30% to first-unit cost |
| Rework rate | Leather rework is often impossible—builds risk into pricing |
At Gem Punch, we recommend approving a physical sample on identical leather before any production run over 10 units. The cost of one sample is negligible compared to ruining a full batch.
Frequently Asked Questions
Can any embroidery machine sew on leather?
Technically yes, but results vary dramatically. Commercial machines with adjustable presser foot pressure, sharp-point needle capability, and precise tension control produce professional results. Home machines often lack the power and precision for heavy leather.
What is the thinnest leather that can be embroidered?
Approximately 1 oz (0.4 mm) is the practical minimum for direct embroidery. Thinner materials require applique techniques or patches to avoid tearing.
Does embroidery weaken leather over time?
Yes, but minimally if done correctly. The perforation line creates a theoretical weak point, but properly spaced stitches on quality leather do not compromise structural integrity under normal use. Dense stitching on thin leather is where failure occurs.
Can you remove embroidery from leather?
No. Unlike fabric where stitches can be picked out and the weave recovers, leather embroidery is permanent. Removal leaves a perforated outline that cannot be hidden. This is why sampling is critical.
Is hand embroidery better than machine on leather?
For artistic, one-off pieces, hand embroidery offers control and character impossible to replicate by machine. For consistency, speed, and commercial production, machine embroidery is superior. The choice depends on your project goals.
What thread count should I use for leather?
40-weight thread is standard. 60-weight is available for very fine detail on delicate leather but is harder to work with. 30-weight is used for bold, visible stitches on heavy leather.
How do I prevent the needle from leaving marks around the design?
Marks are usually caused by presser foot pressure or hoop burn. Use a roller presser foot or Teflon foot to reduce friction. Hoop with adhesive methods rather than direct clamping.
Final Thoughts
Embroidery on leather is not a beginner’s technique—but it is one of the most rewarding when executed correctly. The combination of leather’s natural prestige and embroidery’s precision creates products that command attention, respect, and premium pricing.
Success requires three things: the right leather, digitizing adjusted for zero-recovery material, and production discipline (slow speeds, proper needles, careful hooping). Skip any of these, and you risk damaging expensive material. Master all three, and you produce heirloom-quality work.
At Gem Punch, we specialize in leather embroidery digitizing and production. Whether you need a single motorcycle vest back panel or a thousand corporate portfolios, our digitizers understand the unique demands of leather and program every file to protect your material while maximizing visual impact.
Ready to embroider on leather? Send us your artwork and leather specifications for a free digitizing assessment and production quote.