A patch only looks as good as the way it’s applied. You could order the sharpest, most detailed embroidered patch on the market, and it will still look sloppy if it’s crooked, peeling at the edges, or stitched with loose, uneven thread.
The good news: applying a patch correctly isn’t difficult once you know How to Apply Patches and which method fits your patch backing and your garment. This guide walks through every common application method — iron-on, sew-on, and Velcro — along with the tools, techniques, and mistakes to avoid, so your patches stay put and look professional for years, not weeks.
Whether you’re attaching a military patch to a uniform, a club patch to a leather vest, or a brand patch to a work jacket, the steps below will get it done right the first time.
Know Your Patch Backing Before You Start
Not all patches attach the same way. The backing determines your method, so check what you’re working with before you touch an iron or a needle.
Iron-On (Heat-Activated Adhesive) A layer of heat-sensitive glue is applied to the back of the patch. Heat from an iron melts the adhesive and bonds it to the fabric underneath.
Sew-On (No Adhesive) A plain fabric backing with no glue. These patches are attached entirely with thread, either by hand or machine.
Velcro (Hook-and-Loop) The patch is backed with the “hook” side of a Velcro pair, while the loop side is sewn onto the garment. This allows patches to be swapped in and out.
Self-Adhesive (Peel-and-Stick) A removable adhesive backing, similar to a sticker. Common on low-cost novelty patches, but not recommended for anything worn regularly or washed often.
Combination Backings Many patches — especially from custom patch makers — combine iron-on adhesive with a sew-on border, giving you a quick temporary hold plus the option to stitch it permanently later. If you ordered custom patches, check your order confirmation or packaging; the backing type is usually specified there.
What You’ll Need
Before you begin, gather the right supplies for your method:
- Household iron (for iron-on patches)
- Ironing board or heat-safe flat surface
- Thin cotton cloth or pressing cloth
- Needle and matching or contrasting thread (for sew-on patches)
- Sewing machine (optional, for faster or heavier-duty stitching)
- Straight pins or fabric clips
- Fabric marker or tailor’s chalk
- Scissors
- Ruler or measuring tape
How to Iron On a Patch (Step-by-Step)
Iron-on application is the fastest method and works well on most cotton, denim, and polyester-blend garments. It is not recommended for leather, nylon, waterproof shells, or delicate fabrics that can’t handle direct heat.
Step 1: Set the Iron Temperature
Set your iron to the cotton or wool setting, with steam turned off. Heat, not steam, is what activates the adhesive.
Step 2: Preheat the Application Area
Iron the spot on the garment where the patch will go for about 10–15 seconds. This removes moisture and warms the fabric so the adhesive bonds evenly.
Step 3: Position the Patch
Place the patch adhesive-side down exactly where you want it. Use a fabric marker to lightly outline the corners on the garment first if you want to guarantee straight placement — this matters most on jacket backs and chest panels, where even a slight tilt is noticeable.
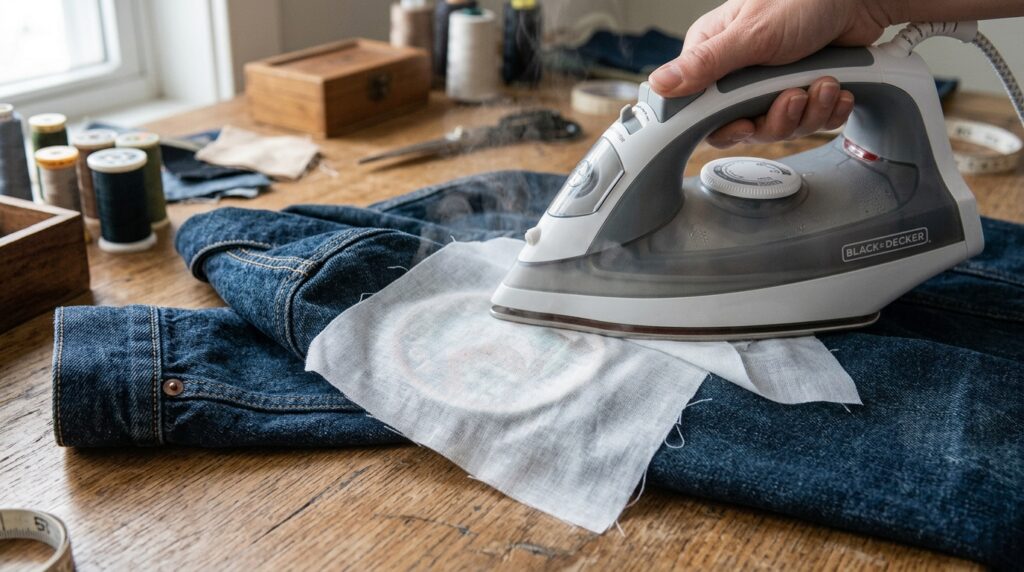
Step 4: Cover with a Pressing Cloth
Lay a thin cotton cloth over the patch. This protects both the patch design and your iron from direct heat contact and prevents scorching.
Step 5: Apply Firm, Even Heat
Press the iron down firmly — don’t slide it back and forth like normal ironing. Hold it in place for 20–30 seconds, then lift, reposition slightly if the patch is large, and press again until the entire surface has been heated evenly. For larger back patches, work in overlapping sections.
Step 6: Check the Bond
Let the patch cool completely before touching it. Once cool, gently try to lift a corner. If it resists, the bond is solid. If any edge lifts easily, repeat the heat application on that section.
Step 7: Reinforce with Stitching (Recommended)
Iron-on adhesive alone will loosen over time, especially with regular washing or wear. For anything beyond occasional use — jackets, bags, uniforms — stitch around the patch edge even if it’s already ironed on. This is the difference between a patch that lasts a season and one that lasts for years.
How to Sew On a Patch (Step-by-Step)
Sewing is the most durable application method and the standard for military, police, and motorcycle club patches, which are handled roughly and need to hold up to years of wear.
Step 1: Position and Pin
Place the patch where you want it and secure it with straight pins or fabric clips at each corner, or every couple of inches around a curved patch like a top or bottom rocker.
Step 2: Thread Your Needle
Use a strong polyester or nylon thread that matches (or intentionally contrasts with) the patch border. Double the thread through the needle and knot the ends for extra strength.
Step 3: Start From the Back
Push the needle through the garment from the inside, coming up right at the patch’s edge. Starting from the back hides your knot.
Step 4: Stitch Around the Perimeter
Use a whipstitch or blanket stitch, sewing through the patch border and the garment fabric in small, even stitches — about 1/8 inch apart. Keep tension consistent so the patch lies flat without puckering.
By hand: Expect 20–40 minutes for a standard 3–4 inch patch, depending on stitch density.
By machine: A zigzag stitch around the patch border is faster and holds tighter. Go slowly around curves and corners, and backstitch at the start and end to lock the thread.
Step 5: Knot and Trim
Once you’ve stitched all the way around, tie off the thread on the inside of the garment and trim any excess.
Step 6: Press Flat
Iron the finished patch (low heat, no steam) from the inside of the garment to smooth out any puckering from the stitching.
How to Apply a Velcro-Backed Patch
Velcro backing is the go-to choice when patches need to be interchangeable — tactical gear, uniforms with rotating unit designations, or seasonal patch displays.
Step 1: Sew the Loop Side to the Garment
The soft “loop” side of the Velcro pair gets sewn onto the garment first, using a straight or zigzag stitch around all four edges. This piece stays permanently attached.
Step 2: Attach the Hook Side to the Patch
If your patch didn’t come pre-attached to hook-and-loop backing, sew or iron the rough “hook” side directly onto the back of the patch, matching its dimensions.
Step 3: Press the Patch On
Once both pieces are in place, simply press the patch onto the garment. It should hold firmly but allow you to remove and swap it whenever needed.
Tip: Always match hook-to-loop, not hook-to-hook. If your patch already has hook backing (most do), make sure you’re sewing the loop side — not another hook piece — onto the garment.
Common Patch Application Mistakes to Avoid
Skipping the preheat step. Ironing a cold, slightly damp garment leads to a weak, uneven bond that peels within a few wears.
Using steam on iron-on patches. Steam interferes with adhesive activation. Always turn steam off.
Sliding the iron instead of pressing. Iron-on adhesive needs sustained, direct pressure — sliding the iron spreads heat too thin to activate the glue fully.
Ironing directly on delicate or synthetic fabrics. Nylon, leather, and some polyester blends can scorch or melt. Test on a hidden corner first, or switch to sew-on application.
Not reinforcing iron-on patches with stitching. Adhesive-only patches loosen with washing. A quick stitch around the border more than doubles the lifespan.
Mismatched thread tension when sewing. Stitches that are too tight will pucker the fabric; too loose and the patch will sag. Aim for even, moderate tension throughout.
Placing the patch without measuring first. Especially on jackets and vests with multiple patches (top rocker, center patch, bottom rocker), even small misalignments are highly visible. Measure and mark before you commit.
Patch Placement Guide by Garment
Jackets and Vests: Left chest for name or rank patches, full back for large club or brand patches, sleeves for smaller achievement or unit patches.
Uniforms: Standard placement is dictated by department or organizational guidelines — always check official regulations before applying, since incorrect placement on a military or police uniform can violate dress code.
Hats and Caps: Centered on the front panel, sized to leave a small margin from the seams.
Bags and Backpacks: Flat, low-flex areas hold patches best; avoid zippered pockets that flex constantly, since repeated movement stresses the stitching or adhesive.
How Long Should a Properly Applied Patch Last?
With correct application and reasonable care, patches typically hold up as follows:
- Sewn patches: 10+ years, even with regular washing and heavy wear
- Iron-on with stitched reinforcement: 5–10 years
- Iron-on only: 1–3 years, shorter with frequent washing
- Velcro: 10+ years for the loop side; hook-side wear depends on how often the patch is swapped
If you’re investing in a custom embroidered or woven patch, sewing it on — or at minimum reinforcing an iron-on patch with stitching — protects that investment for the long run.
Frequently Asked Questions
Can I iron on a patch without a pressing cloth?
It’s not recommended. Direct iron contact can scorch the patch design or melt synthetic threads. A thin cotton cloth protects both the patch and your iron with no downside.
Do I need a sewing machine to sew on a patch?
No. Hand-sewing works fine for most patches and is often preferred for curved pieces like rocker patches, where machine stitching around tight curves is harder to control.
Can iron-on patches be removed and reapplied elsewhere?
Generally no. The adhesive is designed for a permanent bond, and removing an iron-on patch usually damages the patch backing and leaves adhesive residue on the garment. Velcro backing is the right choice if you need repositionable patches.
What’s the strongest way to attach a patch?
Sewing is the most durable method for garments that see regular wear and washing. For maximum hold, many people iron a patch on first to keep it in place, then sew around the border for a permanent, reinforced bond.
Can I apply a patch to leather?
Leather can’t be ironed, since heat damages the material. Sewing is the standard method for leather vests and jackets — this is also why most motorcycle club and biker patches are sew-on rather than iron-on.
Get Your Custom Patches Made Right
At Gem Punch, every custom patch we produce — embroidered, woven, PVC, or Velcro-backed — is built for whichever application method you plan to use, with backing options specified clearly at order time.
Whether you need military patches, police patches, biker patches, or custom brand patches for your team, our team handles the digitizing and production — you handle the application, using the steps above.
Related Resources
- Complete Guide to Custom Patches — All patch types and applications
- Patch Sizing Guide — Getting your patch dimensions right before you order
- Motorcycle Club Patch Design Guide — Placement rules and structure for MC patches
- Custom Patches Service — Browse patch types and get a free quote