Vector art is the foundation of every professional embroidery job. It determines whether your logo stitches out clean and sharp — or blurry, jagged, and completely unusable by the time it reaches your garment.
At Gem Punch, our team of 100+ vector artists and digitizers has worked with every type of artwork imaginable across 13+ years and over half a million patches delivered. We have received perfect AI files from Fortune 500 design teams and blurry phone photos of hand-drawn sketches from first-time business owners. We have rebuilt logos from old patches, reconstructed designs from promotional mugs, and converted crayon drawings into production-ready embroidery files.
This guide consolidates everything we have learned about vector art for embroidery into a single definitive reference — for anyone who orders embroidery, manages a brand, designs artwork, or simply wants to understand why their file keeps getting rejected.
Table of Contents
- What Is Vector Art?
- Why Vector Art Matters for Embroidery
- Raster vs. Vector — The Critical Difference
- Vector File Formats Explained
- Color Modes — RGB, CMYK, and Pantone
- How Raster-to-Vector Conversion Works
- Vector Art Software — 8 Tools Reviewed
- How to Prepare Your File for Embroidery
- Common Vector Art Mistakes and How to Fix Them
- Working with a Vector Art Service
- Brand Consistency and Vector Art
- Real-World Case Studies
- FAQ — 15 Common Questions
1. What Is Vector Art?
Vector art is digital artwork built from mathematical equations rather than pixels. Instead of storing an image as a grid of colored dots, vector software stores it as a set of paths, points, and curves defined by coordinates and formulas.
The practical result is remarkable: a vector file can scale from a 1-inch patch to a 40-foot billboard with zero loss of quality. The edges stay perfectly sharp. The colors stay perfectly clean. The file size barely changes.
The Problem It Solves
Most logos and artwork start life as raster files — JPEGs, PNGs, screenshots, or photographs. These files are made of pixels. When you enlarge them, quality degrades immediately. Edges go jagged. Colors blend and blur at their boundaries. Fine text becomes illegible.
Embroidery machines follow stitch paths, not pixels. They need clean, precisely defined edges and solid, well-separated colors. When your artwork is unclear, the digitizer has to make judgment calls — and judgment calls introduce inconsistency that shows up directly in the finished product.
What professional vector artists actually do for every order:
- Analyze the original artwork and identify what will and will not translate to embroidery
- Manually redraw every element using vector paths — no automation, no shortcuts
- Separate colors cleanly so each element maps to exactly one thread color
- Simplify fine detail that falls below the minimum stitch threshold
- Deliver files in every required format (AI, EPS, SVG, PDF) with the original editable source included
Each of these steps directly affects how your finished embroidery looks on the garment or patch. Skipping any one of them introduces problems you will only discover at production.
2. Why Vector Art Matters for Embroidery
This is the critical truth that every first-time embroidery customer needs to hear: bad artwork equals bad embroidery — always. No digitizer, however skilled, can produce clean stitches from a blurry, pixelated source file.
The Real Cost of Poor Artwork
The chain reaction of bad artwork looks like this:
- The digitizer spends extra hours cleaning up raster files → adds cost and delays your order
- Auto-tracing creates jagged paths → stitches follow those jagged paths exactly → finished embroidery looks rough
- Unclear color boundaries → digitizer guesses where one color ends → thread bleeds into adjacent areas
- Fine detail falls below the minimum stitch threshold → the design you approved looks nothing like the finished patch
Rework on 500 patches due to bad artwork runs between $500 and $2,000. The cost of proper vectorization upfront: $15–$50. This is not a close comparison.
The Value of Clean Vector Art
When your artwork is properly prepared, the benefits compound across every order:
- Sharp, professional stitch lines that match your design exactly
- Thread colors that map cleanly to your brand references
- Fast digitizing with no back-and-forth file cleanup
- Files that work across every application — embroidery, screen print, large format, and web
- Brand consistency across every supplier you ever use
If you order custom patches or embroidery digitizing regularly, a clean master vector file is the single highest-leverage investment you can make before any order begins.
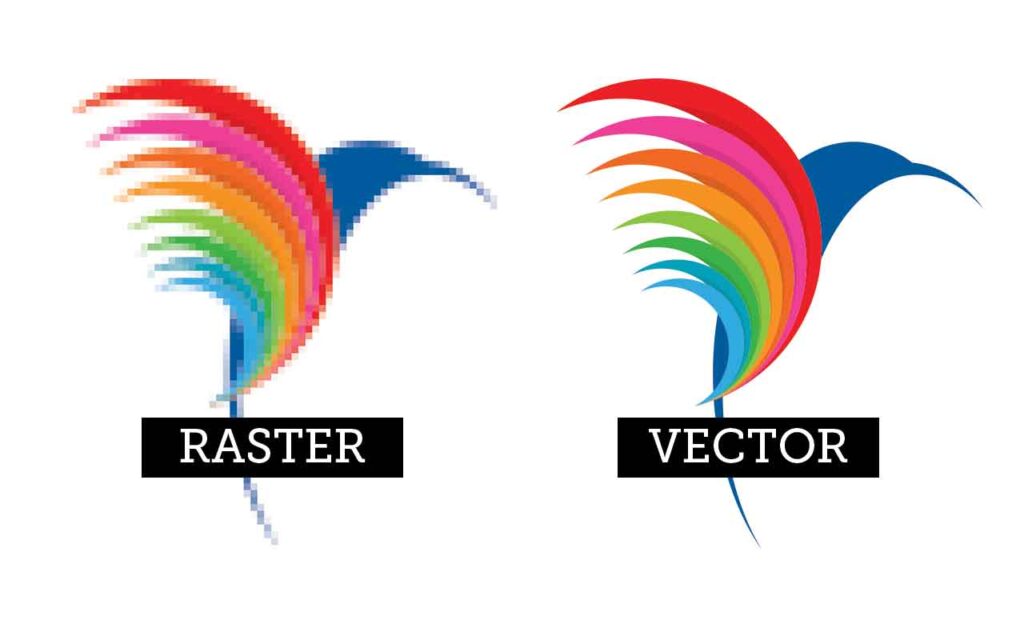
3. Raster vs. Vector — The Critical Difference
Understanding this difference is the foundation of everything else in this guide.
Raster Images
Raster images are made of pixels — tiny colored squares arranged in a grid. Every photograph is a raster image. JPEG, PNG, GIF, BMP, and WEBP are all raster formats.
Quality is determined by resolution, measured in DPI (dots per inch). A 72 DPI image looks fine on a screen but will blur badly when enlarged for production. 300 DPI is the minimum for print quality. The fundamental problem: you cannot recover detail that was never there. Enlarging a raster image only makes it worse — it does not add information, it just spreads existing pixels across a larger area.
Vector Images
Vector images store mathematical instructions: draw a curve from point A to point B with this radius; fill this closed path with this color. The software recalculates these instructions every time the image is displayed — always at the native resolution of the output device.
A vector image is infinitely scalable. Whether 1 inch or 100 feet, the curves are recalculated from scratch at the correct size. Edges are always sharp. Colors are always clean. No interpolation. No blurring.
Side-by-Side Comparison
| Property | Raster (JPG, PNG) | Vector (AI, EPS, SVG) |
| Based on | Pixels | Mathematical paths |
| Scalability | Degrades when enlarged | Perfect at any size |
| File size | Large | Small |
| Color editing | Destructive, affects adjacent pixels | Non-destructive, click any element |
| Embroidery use | Needs conversion first | Ready for digitizing |
| Best for | Photography | Logos, icons, text, patches |
| Software | Photoshop | Illustrator, CorelDRAW, Affinity |
The industry rule: never submit a raster file for embroidery without confirming with your supplier that vectorization is included in their service. At Gem Punch it is always included — but it adds time to your order, and knowing this upfront lets you plan accordingly.
4. Vector File Formats Explained
There are five vector formats you will encounter regularly in embroidery production. Here is what each one is, when to use it, and what to watch out for.
Adobe Illustrator (.AI) — Industry Standard
The format most digitizing studios prefer. AI files preserve every layer, color, font, and effect with perfect fidelity. If your designer uses Illustrator, always request the original AI file. Never accept a rasterized export if the original AI exists.
Best for: Logo delivery to embroidery and print suppliers, any situation where file integrity matters most.
Limitation: Requires Adobe Illustrator to edit natively.
Gem Punch recommendation: First preference. Send this whenever possible.
Encapsulated PostScript (.EPS) — Universal Format
Readable by virtually every design application ever made. EPS has been the industry standard for print production for decades and is accepted by embroidery and screen printing suppliers worldwide.
Best for: Sharing with any supplier when you are unsure what software they use.
Limitation: Some EPS files contain embedded raster images — an EPS file is not automatically a vector. Always confirm it was created in vector software.
Gem Punch recommendation: Second preference after AI. Excellent for cross-supplier use.
Scalable Vector Graphics (.SVG) — Web Standard
An open-format vector standard widely used on the web and in modern design tools. SVG files are readable by browsers, most design software, and many embroidery applications.
Best for: Web use, modern design tools like Figma, sharing across platforms.
Limitation: Not all digitizing software accepts SVG directly. Some SVG features — filters, gradients, masks — do not translate to embroidery.
Gem Punch recommendation: Acceptable. Confirm with your supplier before sending SVG as your only format.
Portable Document Format (.PDF) — Versatile but Verify
A vector PDF — created by exporting from Illustrator rather than scanning a document — contains vector data that is fully usable for digitizing. A PDF created from a raster image is still raster underneath the wrapper.
Best for: Sending proofs, approval workflows, situations requiring both screen and print quality in one file.
Limitation: A PDF wrapper does not make raster artwork into vector. Always clarify whether your PDF is vector or raster before submitting.
Gem Punch recommendation: Vector PDFs work well. Always tell us it is a vector PDF when you send one.
CorelDRAW (.CDR) — Regional Standard
The native format of CorelDRAW, popular in certain print industries and regions. CDR files are not readable by Illustrator or most other applications without conversion.
Best for: If you or your designer works in CorelDRAW.
Limitation: Convert to EPS or AI before sending to any digitizing supplier.
Gem Punch recommendation: Export as EPS before sending. CorelDRAW EPS exports are consistently high quality.
5. Color Modes — RGB, CMYK, and Pantone
Color mode is one of the most misunderstood aspects of artwork preparation. Getting it wrong does not make your file unusable — but it can make accurate thread color matching much harder.
RGB (Red, Green, Blue)
The color mode used by screens — monitors, phones, televisions. RGB can produce vivid, saturated colors that are physically impossible to reproduce in ink or thread.
The problem for embroidery: thread colors exist in the physical world. An RGB color that looks vibrant on your monitor may have no close thread equivalent. Designs created entirely in RGB should always be reviewed against a physical thread color chart before production.
CMYK (Cyan, Magenta, Yellow, Black)
The color mode used for printing. CMYK’s color range is closer to what physical production can achieve and is a better starting point than RGB — but thread color matching still requires manual selection from a thread manufacturer’s palette regardless of the color mode of your source file.
Pantone (PMS) — Gold Standard
A standardized global color system used by brands to ensure consistency across all media. If your brand guidelines specify Pantone 485 C for red, that exact color can be matched in screen printing, embroidery, PVC patches, and print — consistently, across every supplier in the world.
For embroidery, if your client has Pantone colors in their brand guidelines, always share these with your digitizer. Most thread manufacturers — Madeira, Isacord, Gunold — publish Pantone-to-thread conversion charts. This is the most reliable way to get accurate color matching on any order.
Gem Punch tip: Share Pantone numbers or hex codes with every order. We send a thread color match confirmation with every digital proof — you approve colors before a single stitch is made.
6. How Raster-to-Vector Conversion Works {#raster-to-vector-conversion}
If your logo only exists as a JPEG, PNG, or photograph, it needs to be converted to vector before digitizing can begin. Our vector art services cover this fully, but understanding the two approaches helps you evaluate what you are being offered.
Automatic Tracing
Software tools — Illustrator’s Image Trace, Inkscape’s Trace Bitmap, numerous online tools — automatically trace raster images and convert them to vector paths.
Automatic tracing works acceptably for simple, high-contrast images with clearly defined shapes and very few colors. It works poorly for complex logos, low-resolution images, and any design with fine detail or subtle color gradations.
The honest reality: automatic tracers create jagged, over-complicated paths with far more anchor points than necessary. They misinterpret blurry edges as complex shapes. They cannot distinguish between intentional design elements and JPEG compression artifacts. The resulting files often require as much manual cleanup as starting from scratch would have taken.
At Gem Punch, we never use automated tracing for client artwork. The results are consistently inferior to manual redrawing, and inferior results mean problems at production.
Manual Redrawing — What We Do
A skilled vector artist opens your raster image and manually redraws every element from scratch using the pen tool. They trace each shape, set each color, and build a clean vector file that is accurate to your original design but constructed properly from mathematical paths.
Manual redrawing takes 1–4 hours depending on complexity. The results are incomparably better than automated tracing. Every line is smooth. Every color is clean. Every corner is sharp. The resulting file is production-ready for embroidery digitizing, screen printing, and every other application you will ever need.
Vector Art Conversion Pricing at Gem Punch
| Complexity | Description | Price |
| Simple | 1–3 colors, basic shapes | $15 |
| Medium | 4–6 colors, fine detail | $30 |
| Complex | 7+ colors, intricate design | $50+ |
This is a one-time cost. Once your logo exists as a clean vector file, you own it permanently and can use it with any supplier for any application forever. See our full pricing page for current rates.
7. How to Prepare Your File for Embroidery
Sending a vector file is not enough on its own — it needs to be prepared correctly before submission. A technically flawed vector file creates the same problems downstream as a raster file would.
Step 1: Convert All Text to Outlines
Text in a vector file is linked to a specific font. If your digitizer does not have that font installed, it will be substituted with a different one — completely changing the appearance of your design.
In Illustrator: Select All → Type → Create Outlines
In CorelDRAW: Arrange → Convert to Curves
Never send a vector file with live text to a digitizing supplier. No exceptions.
Step 2: Expand All Strokes
Strokes are defined by a center path plus a width value. Different software interprets stroke widths differently. Convert all strokes to filled shapes before sending to eliminate this ambiguity.
In Illustrator: Select All → Object → Expand → check Fill and Stroke → OK
Step 3: Remove All Transparency and Effects
Drop shadows, glows, and blend effects cannot be reproduced in embroidery. Every element must be a solid, flat color. Flatten all transparency before submission.
In Illustrator: Object → Flatten Transparency
Step 4: Separate Colors Clearly
Each distinct color should be its own separate layer or group. Avoid overlapping elements of different colors where the overlap is hidden behind other elements. The digitizer needs to plan stitch order carefully — unclear color structure creates unclear stitch sequencing in the final embroidery digitizing file.
Step 5: Check Minimum Size Requirements
Review every element against these hard production limits before submission:
- Lines thinner than 1mm — will not stitch cleanly; will disappear or blur
- Text shorter than 3mm height (¼ inch) — will be illegible when embroidered
- Gradient fills — cannot be directly embroidered; must be converted to solid colors
These are physical limits of the embroidery process, not guidelines. They apply equally whether you are ordering embroidered patches or uniform embroidery.
Step 6: Specify Size and Placement
Always tell your digitizer the exact finished size and placement before production begins. A left chest logo is typically 3.5″ × 3.5″. A jacket back can be up to 12″ wide. A police patch or military patch has its own size standards determined by branch regulations. The same design requires completely different digitizing parameters at different sizes.
Step 7: Include Color References
Provide Pantone numbers if available. If not, provide hex codes. Note any preferred thread brands or specific color numbers from Madeira, Isacord, or Gunold.
File Format Checklist
Before submitting artwork, confirm:
- ☐ True vector file (.ai, .eps, or vector .pdf) — not a raster file inside a vector wrapper
- ☐ All fonts converted to outlines
- ☐ All strokes expanded to fills
- ☐ Transparency flattened
- ☐ Colors cleanly separated — maximum 2–12 colors
- ☐ Minimum text height 3mm (¼ inch)
- ☐ Minimum line weight 1mm
- ☐ Intended size and placement specified
- ☐ Pantone or hex color references included
8. Common Vector Art Mistakes and How to Fix Them
Mistake #1: Sending a “Vector” File That Is Actually Raster
A JPEG can be placed inside an AI file — this does not make it a vector. The file extension does not determine the file type; the content does.
Result: The digitizer traces a raster image. Stitches follow jagged pixelated paths. Finished embroidery looks rough and unprofessional.
Fix: Open the file in Illustrator. Zoom in to 3,000%. If you see pixelation, the artwork is raster and needs manual redrawing.
Mistake #2: Too Many Colors
Result: Excessive thread changes slow production, increase labor, and raise per-unit price significantly on any order.
Fix: Review the design and consolidate similar colors before submission. Most designs should use 6–12 colors maximum. Designs intended for woven patches or printed applications may have slightly more flexibility, but embroidery has hard limits.
Mistake #3: Gradients and Photographic Effects
Result: Gradients cannot be directly embroidered. The digitizer must approximate with solid colors — often producing a result that looks nothing like what you approved.
Fix: Convert all gradients to 2–3 solid colors before submitting. Discuss with your digitizer if gradient simulation using layered thread blending is appropriate for your design.
Mistake #4: Very Small Text
Result: Characters fill in when stitched and become completely unreadable. Satin stitch lettering below 3mm height has no viable path to legibility regardless of digitizing skill.
Fix: Review every text element before submission. Remove text that cannot be made larger, or discuss simplified alternatives with your digitizer.
Mistake #5: Live Fonts Not Outlined
Result: Your digitizer opens the file on a different computer. The font is not installed. A default system font is substituted. Your logo looks completely different from what you designed.
Fix: Always convert text to outlines before sending. Always.
Mistake #6: Sending a Screenshot or Website Image
Result: A 72 DPI PNG downloaded from your own website requires complete manual redrawing before digitizing can begin. This adds cost and delays.
Fix: Always send the highest resolution version of your artwork — ideally the original source file. If you only have a website image, tell your supplier upfront so they can quote for the redrawing before work starts.
For a deeper breakdown of production mistakes, see our guide on the top mistakes to avoid when digitizing logos for embroidery.
9. Working with a Vector Art Service
If you do not have vector artwork and need it created or converted, a professional vector art service is the right solution. Here is what the process should look like.
What to Provide
When requesting vector art conversion, always provide:
- Highest resolution version of your design you have — print quality if possible
- Brand color guidelines — Pantone numbers, hex codes, CMYK values
- Examples of the design in use — letterheads, products, existing patches
- List of intended applications — embroidery, screen print, large format, web
- Notes on elements that should be simplified or changed for embroidery
What to Expect from a Professional Service
A professional vector artist will:
- Review your submission and confirm scope and cost before starting
- Manually redraw your artwork in vector format — no automated tracing
- Send you a digital proof for approval before delivering final files
- Revise based on your feedback — revisions are included in standard pricing at Gem Punch
- Deliver the final files in AI, EPS, and PDF formats as standard
At Gem Punch, vector art orders are completed within 4–24 hours. We deliver all formats as standard with every order. You own the files permanently — no licensing, no restrictions, use them with any supplier.
Vector Art Pricing at Gem Punch
| Complexity | Description | Price |
| Simple | 1–3 colors, basic shapes, minimal detail | $15 |
| Medium | 4–6 colors, moderate detail | $30 |
| Complex | 7+ colors, intricate design, fine text | $50+ |
| Very complex | Detailed illustrations, highly intricate | Quote on request |
We provide a firm quote before starting on any complex work. Simple logos are quoted and started within one hour of submission. View current rates on our pricing page.
10. Brand Consistency and Vector Art
For businesses ordering embroidered uniforms, custom patches, or branded merchandise, vector art is not just a technical requirement — it is a brand consistency requirement.
Why Brand Consistency Matters
Without a master vector file, your logo will gradually drift across suppliers and applications. The degradation is subtle at first and then suddenly obvious:
- Different suppliers use different raster versions of varying quality
- Colors shift because there is no definitive color reference
- Proportions change as images are scaled and cropped
- Fine details get dropped or approximated differently by every new supplier
After several rounds of this, your logo exists in twelve slightly different versions across all your branded materials. Customers notice even if they cannot articulate why something feels off.
With a master vector file, every supplier receives the same authoritative source. Colors are specified exactly. The file scales perfectly at any size. Your brand looks identical across every application — embroidered patches, screen print, large format signage, digital, and everything in between.
The Cost of Inconsistency vs. the Cost of a Vector File
Brand inconsistency costs: difficult to quantify but real — customer trust erosion, failed print runs, rework costs, recurring file cleanup fees paid to every new supplier you engage.
Master vector file cost: $15–$50 once. Used forever.
Building a Brand Asset Package
If you manage embroidery or merchandise for a brand, build a proper brand asset package and share it with every supplier you work with:
- Master AI or EPS file of the logo
- Logo in multiple configurations (full, simplified, icon-only)
- Color specifications (Pantone, CMYK, RGB, Hex)
- Minimum size guidelines
- Approved thread color matches for embroidery
- Usage rules — approved backgrounds, clear space requirements
This package eliminates inconsistency and saves significant time on every new project. Every police department, military unit, or corporate brand we work with that has one of these packages moves through orders faster and with fewer revisions than those without.
11. Real-World Case Studies
Case Study #1: Police Department — Logo Reconstruction from a Photograph
Client: County sheriff’s department, USA
Challenge: Needed 500 shoulder patches for new uniforms. Artwork submitted: a smartphone photograph of an existing patch — 1.2MP, blurry edges, shot at an angle.
Problem: The photograph showed a detailed shield design with 8 colors and fine text — none of it usable for production as-is.
Solution: Our vector artist manually redrew the entire design from the photograph, using the department’s official seal from their website as an additional reference. We confirmed color specifications by requesting the department’s official Pantone codes. Redrawing time: 3.5 hours. Cost: $30.
Results: Clean vector file approved by the department. Digitized at 4″ size. All 500 police patches produced with zero defects. The department now holds a permanent, production-ready AI file for all future orders.
Cost comparison: $30 vectorization vs. $2,000+ potential rework on 500 patches produced from the original photograph.
Lesson: Any artwork can be worked with if you start correctly. A photograph of a patch is a starting point — not a production file.
Case Study #2: Streetwear Brand — Canva File to Multi-Application Embroidery
Client: Emerging streetwear label, UK
Request: Same logo embroidered on hoodies (left chest), caps (front panel), t-shirts (sleeve), jackets (back), and 3-inch round patches.
Artwork received: PNG exported from Canva at 300 DPI. Logo contained gradient fill lettering and several stroke elements below the 1mm minimum.
Challenge: The same design needed to work at five different sizes — from 1.5 inches on a sleeve to 10 inches on a jacket back. Each size required different simplification. The gradient needed conversion to two solid thread colors. The thin strokes needed to be widened or removed entirely.
Solution: Vectorized the logo, converted the gradient to two complementary solid colors that preserved the original visual effect. Created five separate digitized files optimized for each application and size.
Results: All five embroidery applications looked like the same logo — consistent, on-brand, professional at every size. The brand used the vector files we created for all subsequent merchandise including print runs, hangtags, and packaging.
Cost: Vector conversion $30. Five digitizing files $150 total.
Lesson: One clean vector file pays for itself across every application. Do it once, use it everywhere. This is exactly the same principle we apply to custom patches — the vector file is the investment; the patch is the output.
Case Study #3: Corporate Rebrand — Extracting Vectors from a Broken PDF
Client: Mid-size logistics company, USA
Request: Updated logo embroidered on polo shirts, caps, and hi-vis vests for 200 employees. Three-week deadline.
Problem: The company had just completed a rebrand. Their new logo existed only as a PDF from their design agency — created in InDesign with embedded live fonts (not outlined) and a color profile mismatch. The agency was unresponsive.
Solution: Extracted the vector data from the PDF, corrected the color profile to match the new brand Pantone specifications (3 colors), outlined the fonts, and rebuilt the file cleanly in Illustrator. Total time: 2 hours — less than a full redraw because the underlying vector data was usable despite the structural problems.
Results: All three garment types embroidered, proofed, and approved within the three-week deadline. The company now has a properly prepared AI file. They have since placed four additional rounds of merchandise orders without any artwork issues.
Lesson: Even a broken or partially prepared vector file is faster to fix than starting from scratch. Share whatever you have — a skilled vector artist will make it work.
FAQ — 15 Common Questions About Vector Art for Embroidery
Q1: Do I need vector artwork for embroidery, or can I send a JPEG?
You can send a JPEG, but it will need to be converted to vector before digitizing can begin. At Gem Punch we accept any format and handle the conversion in-house — but this adds time and cost. If you have vector artwork available, always send it.
Q2: What is the difference between vector art conversion and embroidery digitizing?
Vector art conversion turns your raster image into a clean vector file. Embroidery digitizing then takes that vector file and converts it into stitch instructions for an embroidery machine. They are two distinct processes — at Gem Punch we handle both under one roof.
Q3: My designer says they sent a vector file but it looks blurry when I zoom in. What happened?
The file likely contains an embedded raster image inside a vector wrapper — common when logos are designed in Photoshop and placed into Illustrator without proper vectorization. Ask your designer to confirm all elements are vector paths, not placed raster images. Open the file, zoom to 3,000%, and look for pixelation.
Q4: What resolution JPEG should I send if I do not have vector artwork?
Send the highest resolution version you have. For a 4″ embroidery design, a 1200 × 1200 pixel image at 300 DPI is a good starting point. A 200px logo downloaded from a website requires significant reconstruction before digitizing can begin.
Q5: Can you recreate a logo from an old embroidered patch?
Yes. Send us a clear, flat, well-lit photograph of the patch on a neutral background. We can manually redraw the design from the photograph. The better the photo, the more accurate the recreation. We do this regularly for military patches, police patches, and biker patches that have no surviving digital artwork.
Q6: How many colors can my embroidered design have?
Most designs work well with 6–12 colors. Designs with more than 15 colors require many thread changes, increasing production time and cost. We recommend simplifying designs with more than 12 colors where possible.
Q7: Do you match thread colors to Pantone references?
Yes. We match to the nearest available thread color from Madeira, Isacord, or Gunold palettes based on your Pantone or hex specifications. We include a color match list with every digital proof so you approve colors before production begins.
Q8: What vector formats do you accept?
We accept AI, EPS, SVG, PDF, CDR, and most other vector formats. We also accept any raster format — JPG, PNG, BMP, TIFF, PSD — and handle vector conversion in-house.
Q9: Is vector art conversion included in the digitizing price?
Basic file cleanup is included. If your artwork requires significant redrawing — low-resolution raster, hand-drawn sketch, blurry photograph — this is quoted separately. We always confirm scope and cost before starting any work.
Q10: Can I get my vector file back after the order?
Yes. You own your artwork. We deliver all vector files we create as part of every order at no extra charge. Use them with any supplier in the future — no restrictions, no licensing fees.
Q11: What embroidery file formats do you deliver?
DST, PES, JEF, XXX, EXP, HUS, VIP, VP3, and EMB as standard. If you need a format not on this list, contact us — we accommodate most embroidery machine formats.
Q12: How long does vector art conversion take?
Simple logos: 1–4 hours. Complex artwork: 12–24 hours. Rush turnaround is available on request.
Q13: My logo has a gradient — will that work?
Gradients cannot be directly reproduced in embroidery. We will either convert the gradient to solid colors that preserve the visual effect, or use a layered thread blending technique for large-area gradients on sufficiently sized designs. We discuss this with every client before digitizing begins.
Q14: I need the same logo at multiple sizes — do I need new artwork for each?
The vector file works at any size — you only need one. However, each size requires its own digitizing file because stitch parameters (density, pull compensation, underlay) must be adjusted for different sizes. If you order multiple sizes together, we offer discounts on additional size files.
Q15: What is the smallest text that can be embroidered legibly?
Minimum recommended text height for legible embroidery is 3mm (approximately ¼ inch) for satin stitch lettering. Below this, characters fill in and become unreadable. At very small sizes we recommend simplifying or removing the text — we discuss this with every client whose design includes small type elements.
Conclusion
Vector art is not a technical nicety for embroidery — it is the foundation of every professional result. The cleaner your artwork, the faster your digitizing, the sharper your finished embroidery, and the lower your total cost per order.
Key takeaways:
- Vector art is essential for professional embroidery — raster files require conversion before work can begin
- Manual redrawing always outperforms auto-tracing for complex or professional artwork
- AI and EPS are the preferred formats — always request these from your designer
- Convert text to outlines, expand strokes, and remove transparency before submitting
- Specify Pantone or hex colors with every order — color accuracy starts with the artwork
- A master vector file is a one-time investment that saves money on every future order
- 3mm minimum text height and 1mm minimum line weight are hard production limits
Ready to get your artwork production-ready? Get a free vector art assessment from Gem Punch — our team reviews your file and confirms exactly what is needed before any charges are made.
Or go straight to ordering: Order Now and upload your artwork. Our team will be in touch within one hour.
Related Guides
Fundamentals:
The Complete Guide to Embroidery Digitizing | The Complete Guide to Custom Patches | How to Turn Your Logo into a Custom Patch
Patch Types:
Military Patches | Police Patches | Biker Patches | Morale Patches | Fire Patches
Design & Style:
The Psychology of Color in Patch and Embroidery Design | Designing a Company Logo on Patches | How to Design the Perfect Hoodie Patch
Services:
Vector Art Services | Embroidery Digitizing | Custom Patches | Pricing